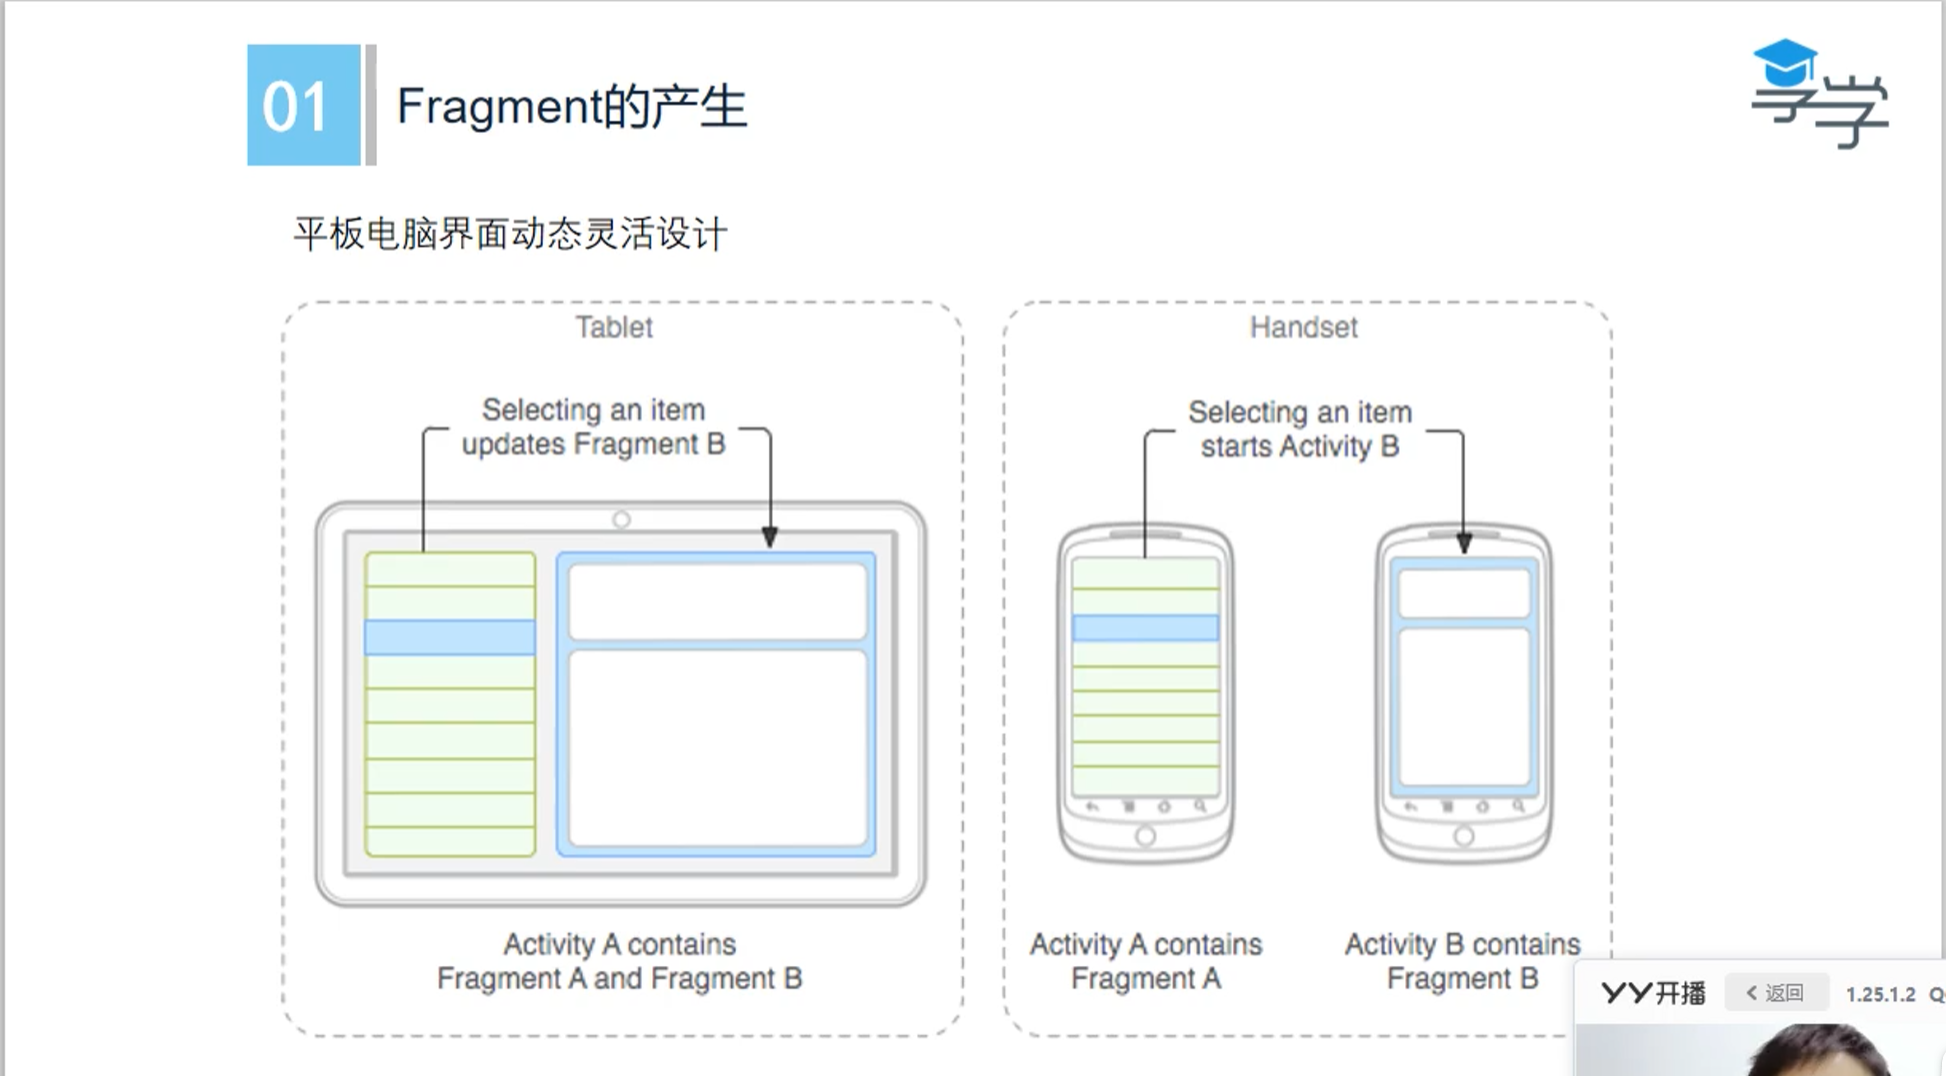
Fragment Fragment的产生
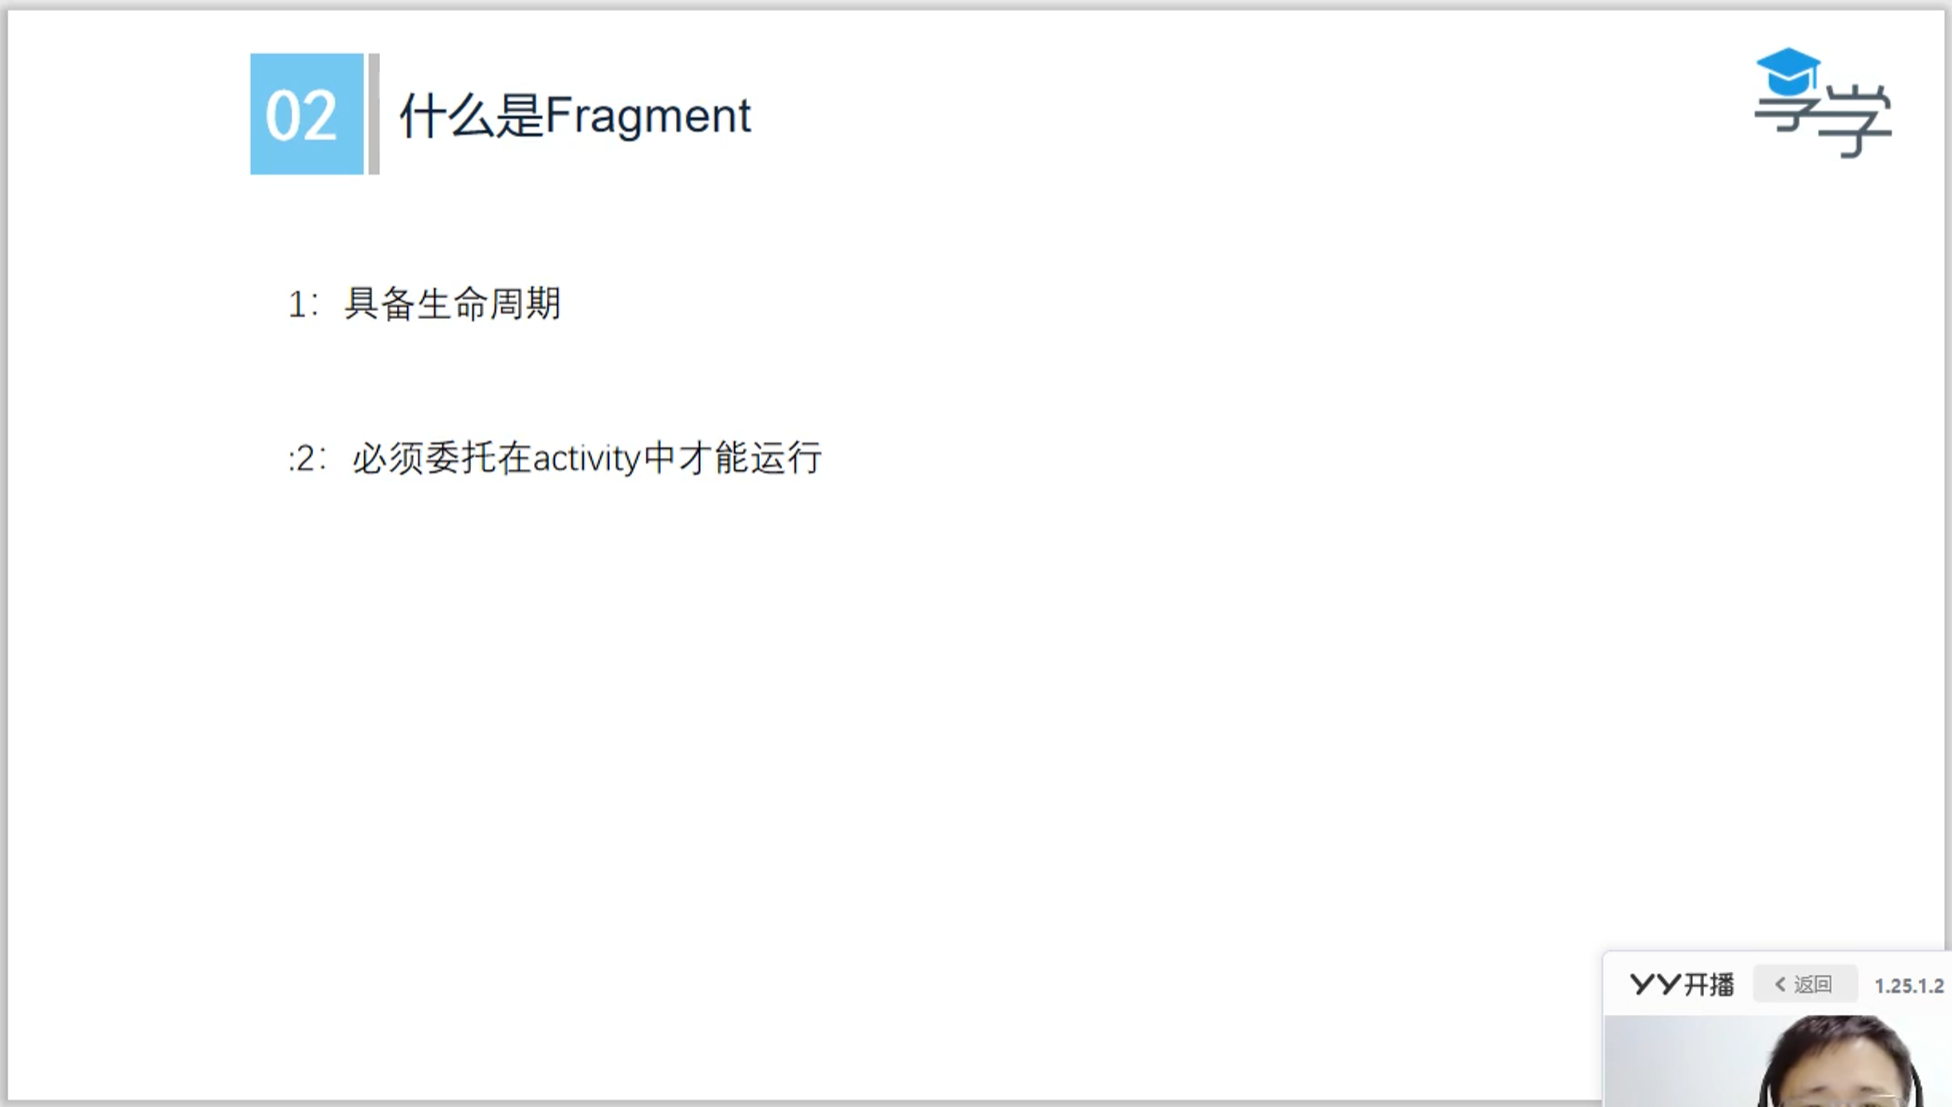
什么是Fragment
Fragment的使用方法 MainActivity.java package a.b.c.fragmentbase;import android.os.Bundle;import androidx.activity.EdgeToEdge;import androidx.appcompat.app.AppCompatActivity;import androidx.core.graphics.Insets;import androidx.core.view.ViewCompat;import androidx.core.view.WindowInsetsCompat;public class MainActivity extends AppCompatActivity { @Override protected void onCreate (Bundle savedInstanceState) { super .onCreate(savedInstanceState); setContentView(R.layout.activity_main); } }
activity_main.xml <?xml version="1.0" encoding="utf-8" ?> <LinearLayout android:layout_height ="match_parent" android:layout_width ="match_parent" android:orientation ="vertical" xmlns:android ="http://schemas.android.com/apk/res/android" > <fragment android:name ="a.b.c.fragmentbase.BlankFragment1" android:layout_width ="match_parent" android:layout_height ="match_parent" android:id ="@id/fragment1" /> </LinearLayout >
BlankFragment1.java package a.b.c.fragmentbase;import android.os.Bundle;import androidx.fragment.app.Fragment;import android.view.LayoutInflater;import android.view.View;import android.view.ViewGroup;import android.widget.Button;import android.widget.TextView;public class BlankFragment1 extends Fragment { private View root; private TextView textView; private Button button; @Override public void onCreate (Bundle saveInstanceState) { super .onCreate(savedInstanceState); } @Override public void onCreateView (LayoutInflater inflater, ViewGroup container, Bundle savedInstanceState) { if (root == null ){ root = inflater.inflate(R.layout.fragment_blank1, container, false ); } textView = root.findViewById(R.id.btn); button.setOnClickListener(new View .OnClickListener(){ @Override public void onClick (View view) { textView.setText("Yes, I am, and you?" ); } }); return root; } }
fragment_blank1.xml <?xml version="1.0" encoding="utf-8" ?> <LinearLayout android:layout_height ="match_parent" android:layout_width ="match_parent" android:orientation ="vertical" xmlns:android ="http://schemas.android.com/apk/res/android" > <TextView android:layout_width ="match_parent" android:layout_height ="40dp" android:text ="@string/hello_blank_fragment" android:id ="@+id/textview" /> <Button android:layout_width ="match_parent" android:layout_height ="40dp" android:id ="@+id/btn" android:text ="How are you?" /> </LinearLayout >
在activity中简单的添加两个fragment activity_main.xml <?xml version="1.0" encoding="utf-8" ?> <LinearLayout android:layout_height ="match_parent" android:layout_width ="match_parent" android:orientation ="vertical" xmlns:android ="http://schemas.android.com/apk/res/android" > <fragment android:name ="a.b.c.fragmentbase.BlankFragment1" android:layout_width ="match_parent" android:layout_height ="match_parent" android:layout_weight ="1" android:id ="@+id/fragment1" /> <fragment android:layout_width ="match_parent" android:layout_height ="match_parent" android:name ="a.b.c.fragmentbase.BlankFragment2" android:layout_weight ="1" android:id ="@+id/fragment2" /> </LinearLayout >
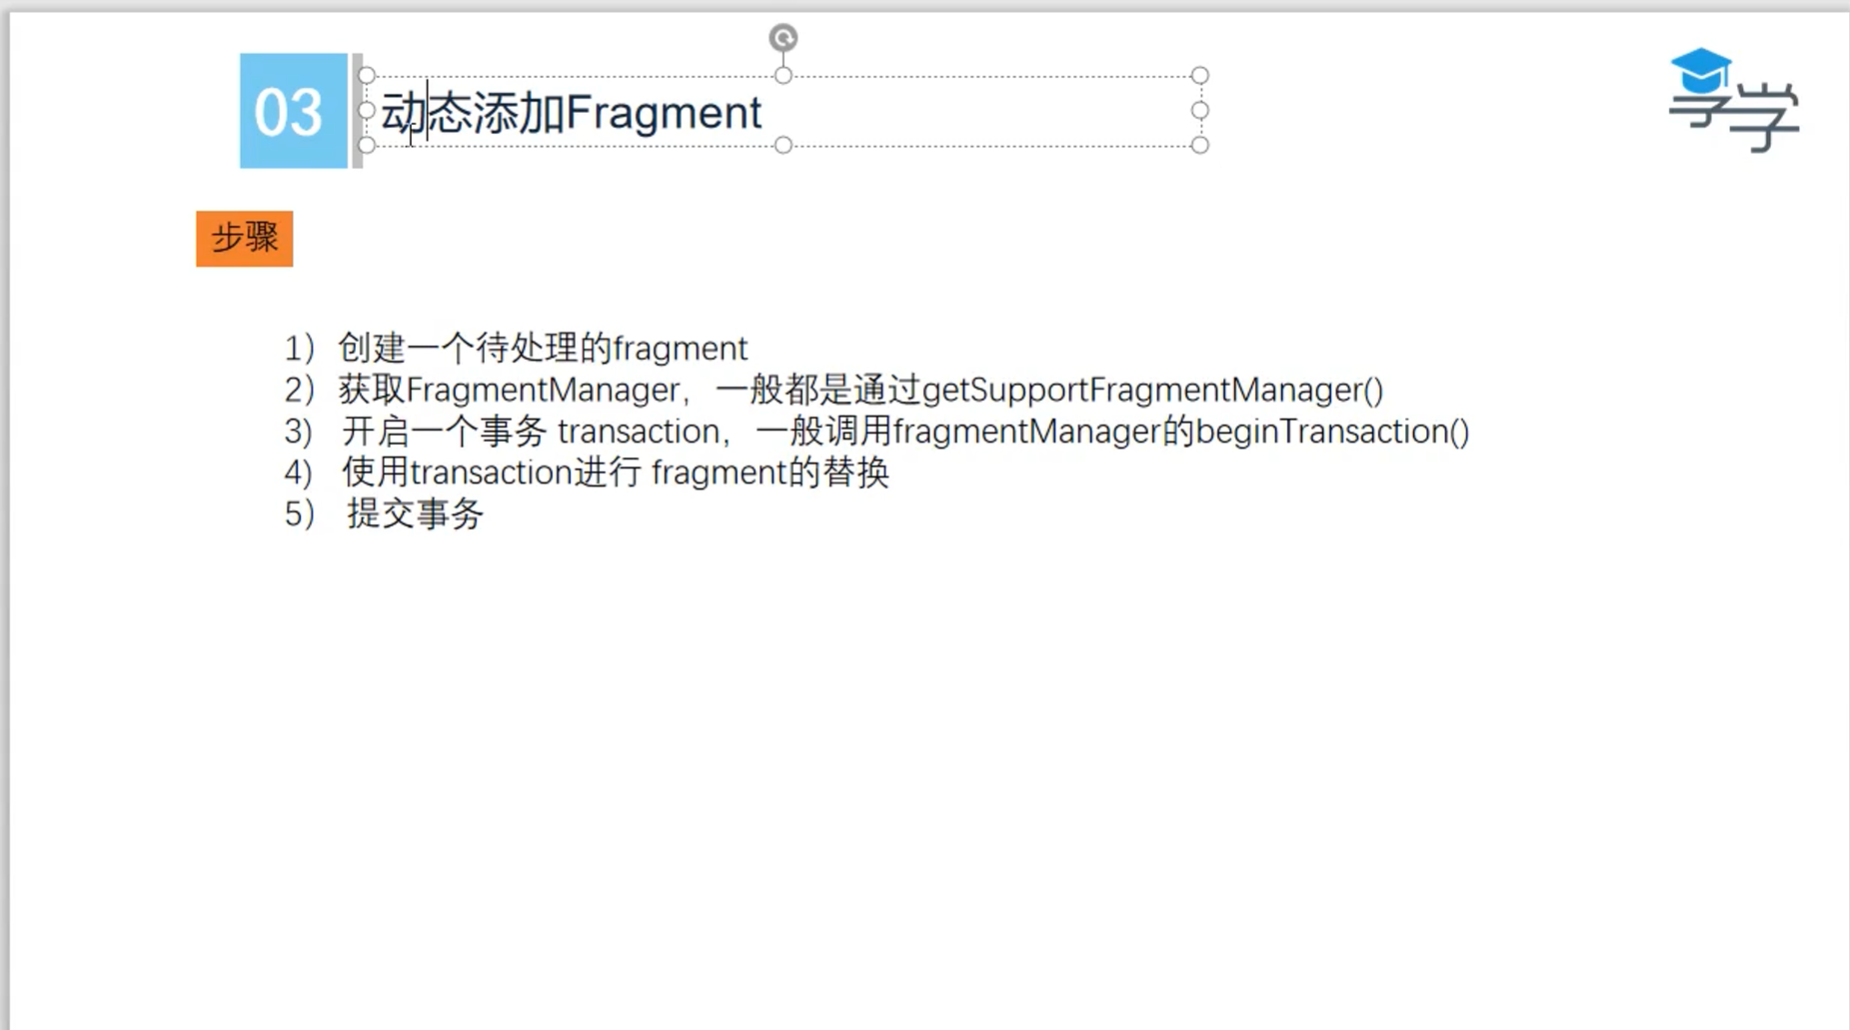
Fragment的产生 动态添加Fragment JDK17以上版本无法使用switch的解决方法:
MainActivity.java package a.b.c.fragmentmangers;import android.os.Bundle;import android.view.View;import android.view.WindowManager;import android.widget.Button;import androidx.appcompat.app.AppCompatActivity;import androidx.fragment.app.Fragment;import androidx.fragment.app.FragmentManager;import androidx.fragment.app.FragmentTransaction;public class MainActivity extends AppCompatActivity implements View .OnClickListener { private Button btn; private Button btn2; @Override protected void onCreate (Bundle savedInstanceState) { super .onCreate(savedInstanceState); setContentView(R.layout.activity_main); btn = findViewById(R.id.btn); btn.setOnClickListener(this ); btn2 = findViewById(R.id.btn_2); btn2.setOnClickListener(this ); } @Override public void onClick (View view) { switch (view.getId()) { case R.id.btn: replaceFragment(new BlankFragment1 ()); break ; case R.id.btn_2: replaceFragment(new ItemFragment ()); break ; } } private void replaceFragment (Fragment fragment) { FragmentManager fragmentManager = getSupportFragmentManager(); FragmentTransaction transaction = fragmentManager.beginTransaction(); transaction.replace(R.id.framelayout,fragment); transaction.addToBackStack(null ); transaction.commit(); } }
BlankFragment1 package a.b.c.fragmentmangers;import android.os.Bundle;import androidx.fragment.app.Fragment;import android.view.LayoutInflater;import android.view.View;import android.view.ViewGroup;public class BlankFragment1 extends Fragment { private static final String ARG_PARAM1 = "param1" ; private static final String ARG_PARAM2 = "param2" ; private String mParam1; private String mParam2; public BlankFragment1 () { } public static BlankFragment1 newInstance (String param1, String param2) { BlankFragment1 fragment = new BlankFragment1 (); Bundle args = new Bundle (); args.putString(ARG_PARAM1, param1); args.putString(ARG_PARAM2, param2); fragment.setArguments(args); return fragment; } @Override public void onCreate (Bundle savedInstanceState) { super .onCreate(savedInstanceState); if (getArguments() != null ) { mParam1 = getArguments().getString(ARG_PARAM1); mParam2 = getArguments().getString(ARG_PARAM2); } } @Override public View onCreateView (LayoutInflater inflater, ViewGroup container, Bundle savedInstanceState) { return inflater.inflate(R.layout.fragment_blank1, container, false ); } }
ItemFragment package a.b.c.fragmentmangers;import android.content.Context;import android.os.Bundle;import androidx.fragment.app.Fragment;import androidx.recyclerview.widget.GridLayoutManager;import androidx.recyclerview.widget.LinearLayoutManager;import androidx.recyclerview.widget.RecyclerView;import android.view.LayoutInflater;import android.view.View;import android.view.ViewGroup;import a.b.c.fragmentmangers.placeholder.PlaceholderContent;public class ItemFragment extends Fragment { private static final String ARG_COLUMN_COUNT = "column-count" ; private int mColumnCount = 1 ; public ItemFragment () { } @SuppressWarnings("unused") public static ItemFragment newInstance (int columnCount) { ItemFragment fragment = new ItemFragment (); Bundle args = new Bundle (); args.putInt(ARG_COLUMN_COUNT, columnCount); fragment.setArguments(args); return fragment; } @Override public void onCreate (Bundle savedInstanceState) { super .onCreate(savedInstanceState); if (getArguments() != null ) { mColumnCount = getArguments().getInt(ARG_COLUMN_COUNT); } } @Override public View onCreateView (LayoutInflater inflater, ViewGroup container, Bundle savedInstanceState) { View view = inflater.inflate(R.layout.fragment_item_list, container, false ); if (view instanceof RecyclerView) { Context context = view.getContext(); RecyclerView recyclerView = (RecyclerView) view; if (mColumnCount <= 1 ) { recyclerView.setLayoutManager(new LinearLayoutManager (context)); } else { recyclerView.setLayoutManager(new GridLayoutManager (context, mColumnCount)); } recyclerView.setAdapter(new MyItemRecyclerViewAdapter (PlaceholderContent.ITEMS)); } return view; } }
MyItemRecyclerViewAdapter.java package a.b.c.fragmentmangers;import androidx.recyclerview.widget.RecyclerView;import android.view.LayoutInflater;import android.view.View;import android.view.ViewGroup;import android.widget.TextView;import a.b.c.fragmentmangers.placeholder.PlaceholderContent.PlaceholderItem;import a.b.c.fragmentmangers.databinding.FragmentItemBinding;import java.util.List;public class MyItemRecyclerViewAdapter extends RecyclerView .Adapter<MyItemRecyclerViewAdapter.ViewHolder> { private final List<PlaceholderItem> mValues; public MyItemRecyclerViewAdapter (List<PlaceholderItem> items) { mValues = items; } @Override public ViewHolder onCreateViewHolder (ViewGroup parent, int viewType) { return new ViewHolder (FragmentItemBinding.inflate(LayoutInflater.from(parent.getContext()), parent, false )); } @Override public void onBindViewHolder (final ViewHolder holder, int position) { holder.mItem = mValues.get(position); holder.mIdView.setText(mValues.get(position).id); holder.mContentView.setText(mValues.get(position).content); } @Override public int getItemCount () { return mValues.size(); } public class ViewHolder extends RecyclerView .ViewHolder { public final TextView mIdView; public final TextView mContentView; public PlaceholderItem mItem; public ViewHolder (FragmentItemBinding binding) { super (binding.getRoot()); mIdView = binding.itemNumber; mContentView = binding.content; } @Override public String toString () { return super .toString() + " '" + mContentView.getText() + "'" ; } } }
activity_main.xml <?xml version="1.0" encoding="utf-8" ?> <LinearLayout android:layout_height ="match_parent" android:orientation ="vertical" android:layout_width ="match_parent" xmlns:android ="http://schemas.android.com/apk/res/android" > <Button android:layout_width ="match_parent" android:layout_height ="wrap_content" android:id ="@+id/btn" android:text ="change" /> <Button android:layout_width ="match_parent" android:layout_height ="wrap_content" android:id ="@+id/btn_2" android:text ="replace" /> <FrameLayout android:layout_width ="match_parent" android:layout_height ="match_parent" android:id ="@+id/framelayout" android:background ="#00BCD4" /> </LinearLayout >
fragment_blank1.xml <?xml version="1.0" encoding="utf-8" ?> <FrameLayout xmlns:android ="http://schemas.android.com/apk/res/android" xmlns:tools ="http://schemas.android.com/tools" android:layout_width ="match_parent" android:layout_height ="match_parent" tools:context =".BlankFragment1" > <TextView android:layout_width ="match_parent" android:layout_height ="match_parent" android:text ="@string/hello_blank_fragment" /> </FrameLayout >
fragment_item.xml <?xml version="1.0" encoding="utf-8" ?> <LinearLayout xmlns:android ="http://schemas.android.com/apk/res/android" android:layout_width ="wrap_content" android:layout_height ="wrap_content" android:orientation ="horizontal" > <TextView android:id ="@+id/item_number" android:layout_width ="wrap_content" android:layout_height ="wrap_content" android:layout_margin ="@dimen/text_margin" android:textAppearance ="?attr/textAppearanceListItem" /> <TextView android:id ="@+id/content" android:layout_width ="wrap_content" android:layout_height ="wrap_content" android:layout_margin ="@dimen/text_margin" android:textAppearance ="?attr/textAppearanceListItem" /> </LinearLayout >
fragment_item_list.xml <?xml version="1.0" encoding="utf-8" ?> <androidx.recyclerview.widget.RecyclerView xmlns:android ="http://schemas.android.com/apk/res/android" xmlns:app ="http://schemas.android.com/apk/res-auto" xmlns:tools ="http://schemas.android.com/tools" android:id ="@+id/list" android:name ="a.b.c.fragmentmangers.ItemFragment" android:layout_width ="match_parent" android:layout_height ="match_parent" android:layout_marginLeft ="16dp" android:layout_marginRight ="16dp" app:layoutManager ="LinearLayoutManager" tools:context =".ItemFragment" tools:listitem ="@layout/fragment_item" />
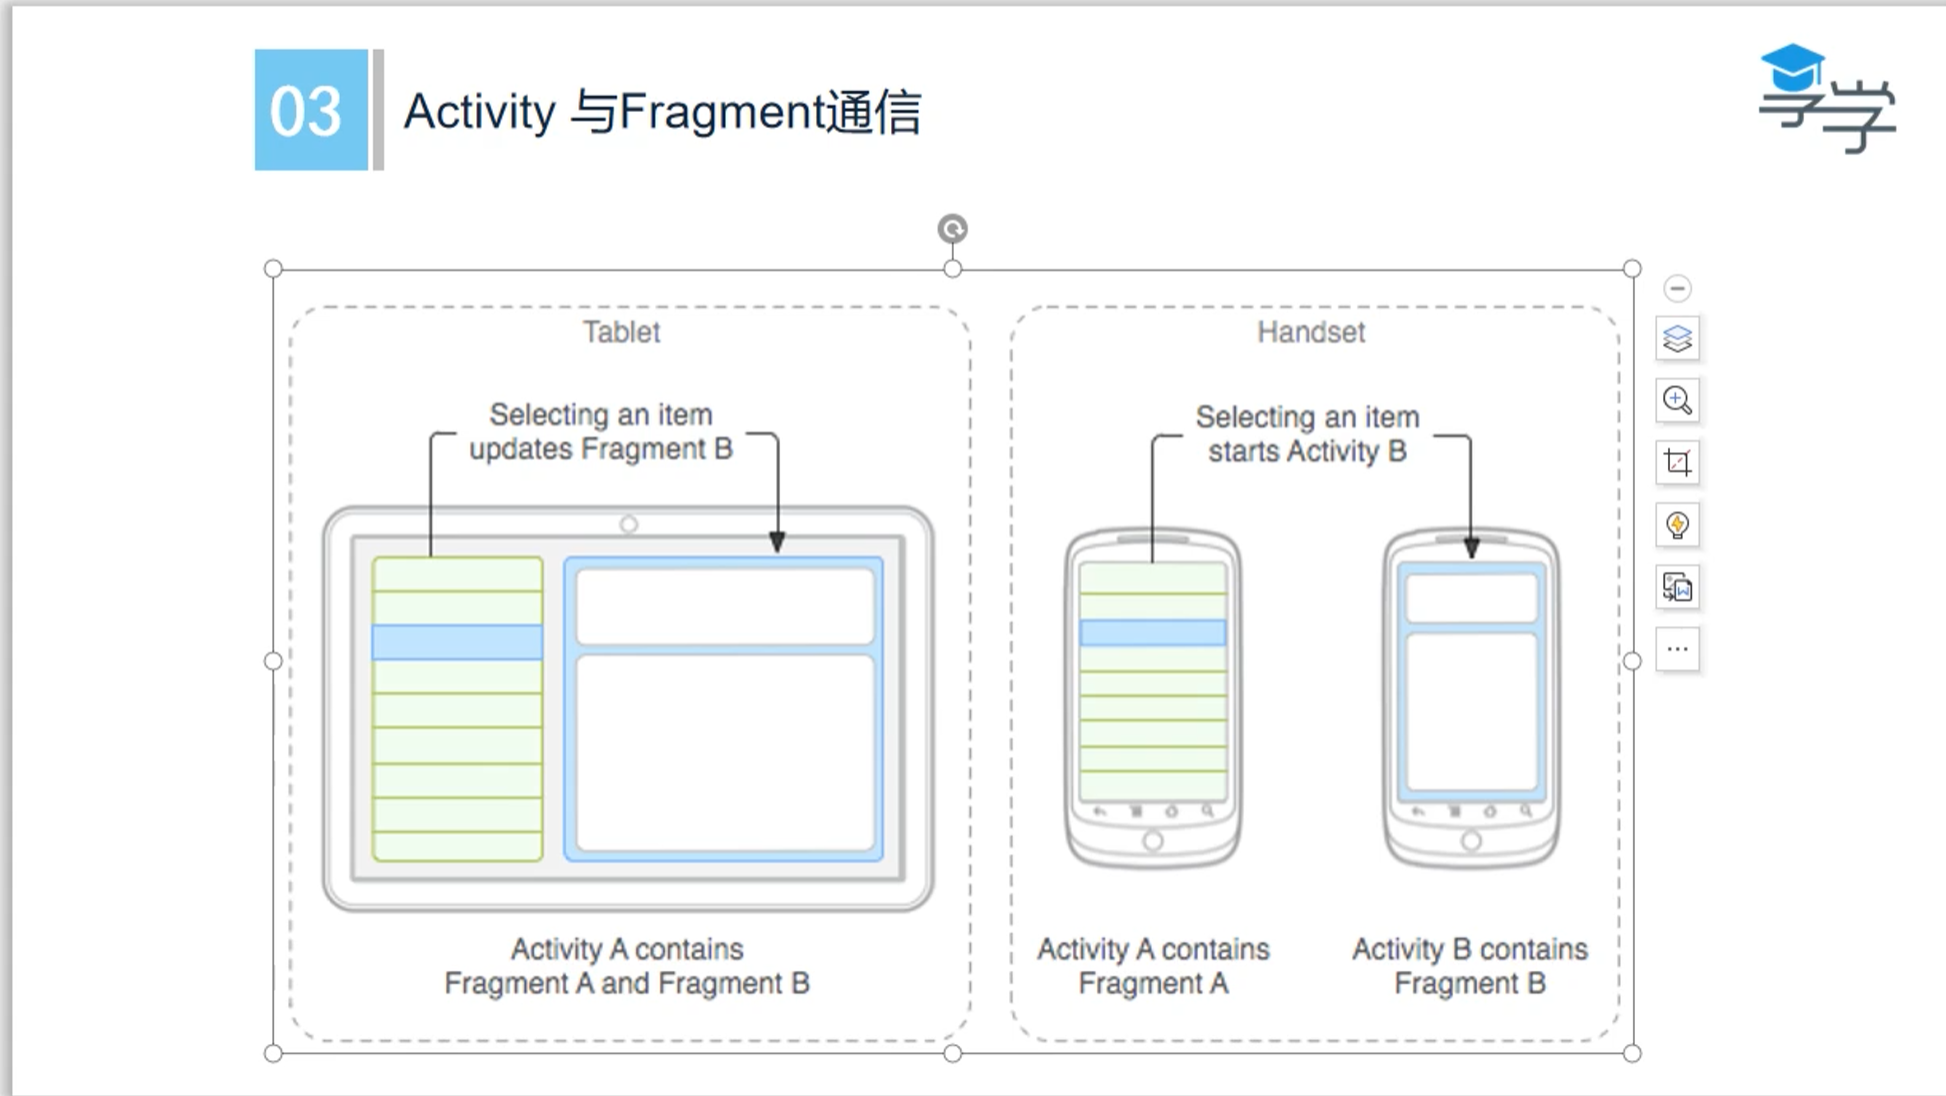
Activity与Fragment通信
使用Bundle
MainActivity.java @Override public void onClick (View view) { switch (view.getId()){ case R.id.btn: Bundle bundle = new Bundle (); bundle.putString("lele" ,"lele" ); BlankFragment1 bf = new BlankFragment1 (); bf.setArguments(bundle); replaceFragment(bf); break ; } }
BlankFragment1.java @Override public void onCreate (Bundle savedInstanceState) { super .onCreate(savedInstanceState); Bundle bundle = this .getArguments(); String string = bundle.getString("lele" ); Log.i("lele" ,string); if (getArguments()!=null ){ mParam1 = getArguments().getString(ARG_PARAM1); mParam2 = getArguments().getString(ARG_PAEAM2); } }
fragment动态添加与管理的总结
Fragment与activity通信的接口方案
原生方案:Bundle
Java语言中类与类之间通信常用方案:接口
MainActivity.java package a.b.c.fragmentmangers;import android.os.Bundle;import android.view.View;import android.view.WindowManager;import android.widget.Button;import android.widget.Toast;import androidx.appcompat.app.AppCompatActivity;import androidx.fragment.app.Fragment;import androidx.fragment.app.FragmentManager;import androidx.fragment.app.FragmentTransaction;public class MainActivity extends AppCompatActivity implements View .OnClickListener{ private Button btn; private Button btn2; @Override protected void onCreate (Bundle savedInstanceState) { super .onCreate(savedInstanceState); setContentView(R.layout.activity_main); btn = findViewById(R.id.btn_2); btn2.setOnClickListener(this ); } @Override public void onClick (View view) { switch (view.getId()){ case R.id.btn: Bundle bundle = new Bundle (); bundle.putString("lele" ,"lele" ); BlankFragment1(bundle); bf.setFragmentCallback(new IFragmentCallback (){ @Override public void sendMsgToActivity (String msg) { Toast.makeText(MainActivity.this ,msg,Toast.LENGTH_SHORT).show(); } @Override public String getMsgFromActivity (String msg) { return "hello, I am from MainActivity" ; } }); replaceFragment(bf); break ; case R.id.btn_2: replaceFragment(new ItemFragment ()); break ; } } private void replaceFragment (Fragment fragment) { FragmentManager fragmentManager = getSupportFragmentManager(); FragmentTransaction transaction = fragmentManager.beginTransaction(); transaction.replace(R.id.framelayout,fragment); transaction.addToBackStack(null ); } }
IFragmentCallback.java package a.b.c.fragmentmangers;public interface IFragmentCallback { void sendMsgToActivity (String string) ; String getMsgFromActivity (String msg) ; }
BlankFragment1.java package a.b.c.fragmentmangers;import android.os.Bundle;import androidx.fragment.app.Fragment;import android.util.Log;import android.view.LayoutInflater;import android.view.View;import android.view.ViewGroup;import android.widget.Button;import android.widget.Toast;public class BlankFragment1 extends Fragment { private static final String ARG_PARAM1 = "param1" ; private static final String ARG_PARAM2 = "param2" ; private String mParam1; private String mParam2; private View rootview; public BlankFragment1 () { } public static BlankFragment1 newInstance (String param1, String param2) { BlankFragment1 fragment = new BlankFragment1 (); Bundle args = new Bundle (); args.putString(ARG_PARAM1, param1); args.putString(ARG_PARAM2, param2); fragment.setArguments(args); return fragment; } @Override public void onCreate (Bundle savedInstanceState) { super .onCreate(savedInstanceState); Bundle bundle = this .getArguments(); String string = bundle.getString("lele" ); Log.i("lele" ,string); if (getArguments() != null ) { mParam1 = getArguments().getString(ARG_PARAM1); mParam2 = getArguments().getString(ARG_PARAM2); } } @Override public View onCreateView (LayoutInflater inflater, ViewGroup container, Bundle savedInstanceState) { if (rootview == null ){ rootview = inflater.inflate(R.layout.fragment_blank1, container, false ); } Button btn = rootview.findViewById(R.id.btn_3); btn.setOnClickListener(new View .OnClickListener() { @Override public void onClick (View view) { String message = fragmentCallback.getMsgFromActivity("null" ); Toast.makeText(BlankFragment1.this .getContext(),message,Toast.LENGTH_SHORT).show(); } }); return rootview; } private IFragmentCallback fragmentCallback; public void setFragmentCallback (IFragmentCallback callback) { fragmentCallback = callback; } }
activity_main.xml <?xml version="1.0" encoding="utf-8" ?> <LinearLayout android:layout_height ="match_parent" android:orientation ="vertical" android:layout_width ="match_parent" xmlns:android ="http://schemas.android.com/apk/res/android" > <Button android:layout_width ="match_parent" android:layout_height ="wrap_content" android:id ="@+id/btn" android:text ="change" /> <Button android:layout_width ="match_parent" android:layout_height ="wrap_content" android:id ="@+id/btn_2" android:text ="replace" /> <FrameLayout android:layout_width ="match_parent" android:layout_height ="match_parent" android:id ="@+id/framelayout" android:background ="#00BCD4" /> </LinearLayout >
fragment_blank.xml <?xml version="1.0" encoding="utf-8" ?> <FrameLayout xmlns:android ="http://schemas.android.com/apk/res/android" xmlns:tools ="http://schemas.android.com/tools" android:layout_width ="match_parent" android:layout_height ="match_parent" tools:context =".BlankFragment1" > <TextView android:layout_width ="match_parent" android:layout_height ="match_parent" android:text ="@string/hello_blank_fragment" /> <Button android:layout_width ="match_parent" android:layout_height ="wrap_content" android:id ="@+id/btn_3" android:layout_gravity ="center" android:text ="数据传递" /> </FrameLayout >
fragment_item.xml <?xml version="1.0" encoding="utf-8" ?> <LinearLayout xmlns:android ="http://schemas.android.com/apk/res/android" android:layout_width ="wrap_content" android:layout_height ="wrap_content" android:orientation ="horizontal" > <TextView android:id ="@+id/item_number" android:layout_width ="wrap_content" android:layout_height ="wrap_content" android:layout_margin ="@dimen/text_margin" android:textAppearance ="?attr/textAppearanceListItem" /> <TextView android:id ="@+id/content" android:layout_width ="wrap_content" android:layout_height ="wrap_content" android:layout_margin ="@dimen/text_margin" android:textAppearance ="?attr/textAppearanceListItem" /> </LinearLayout >
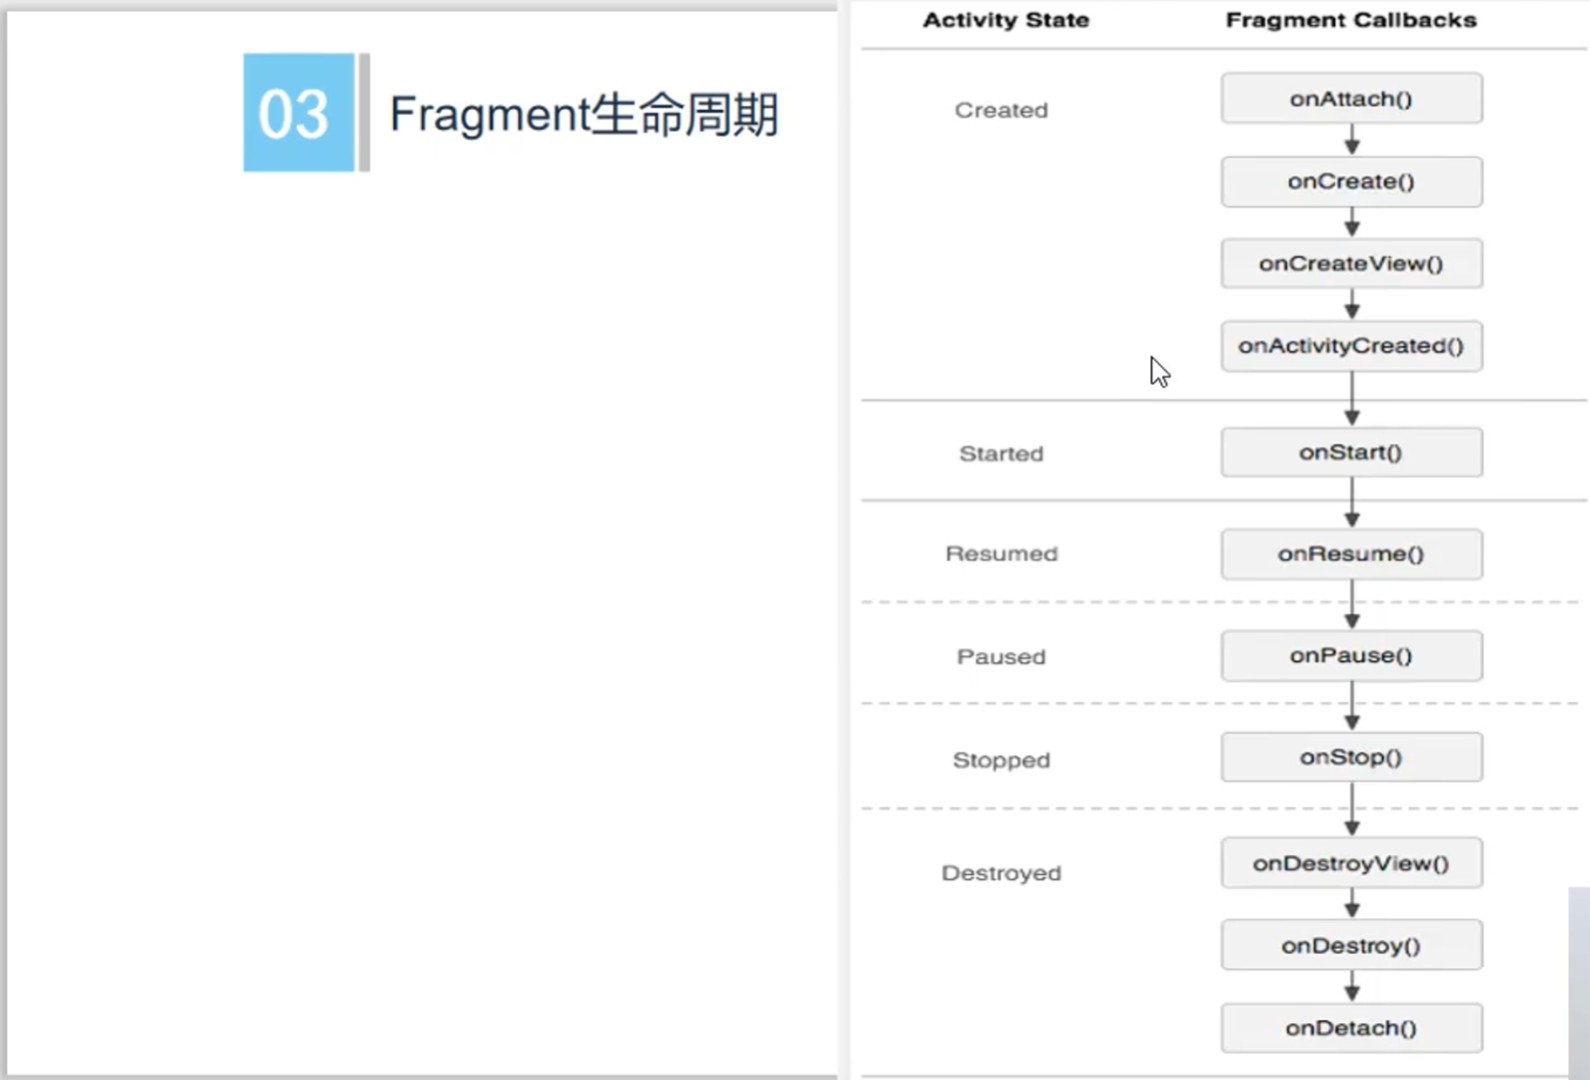
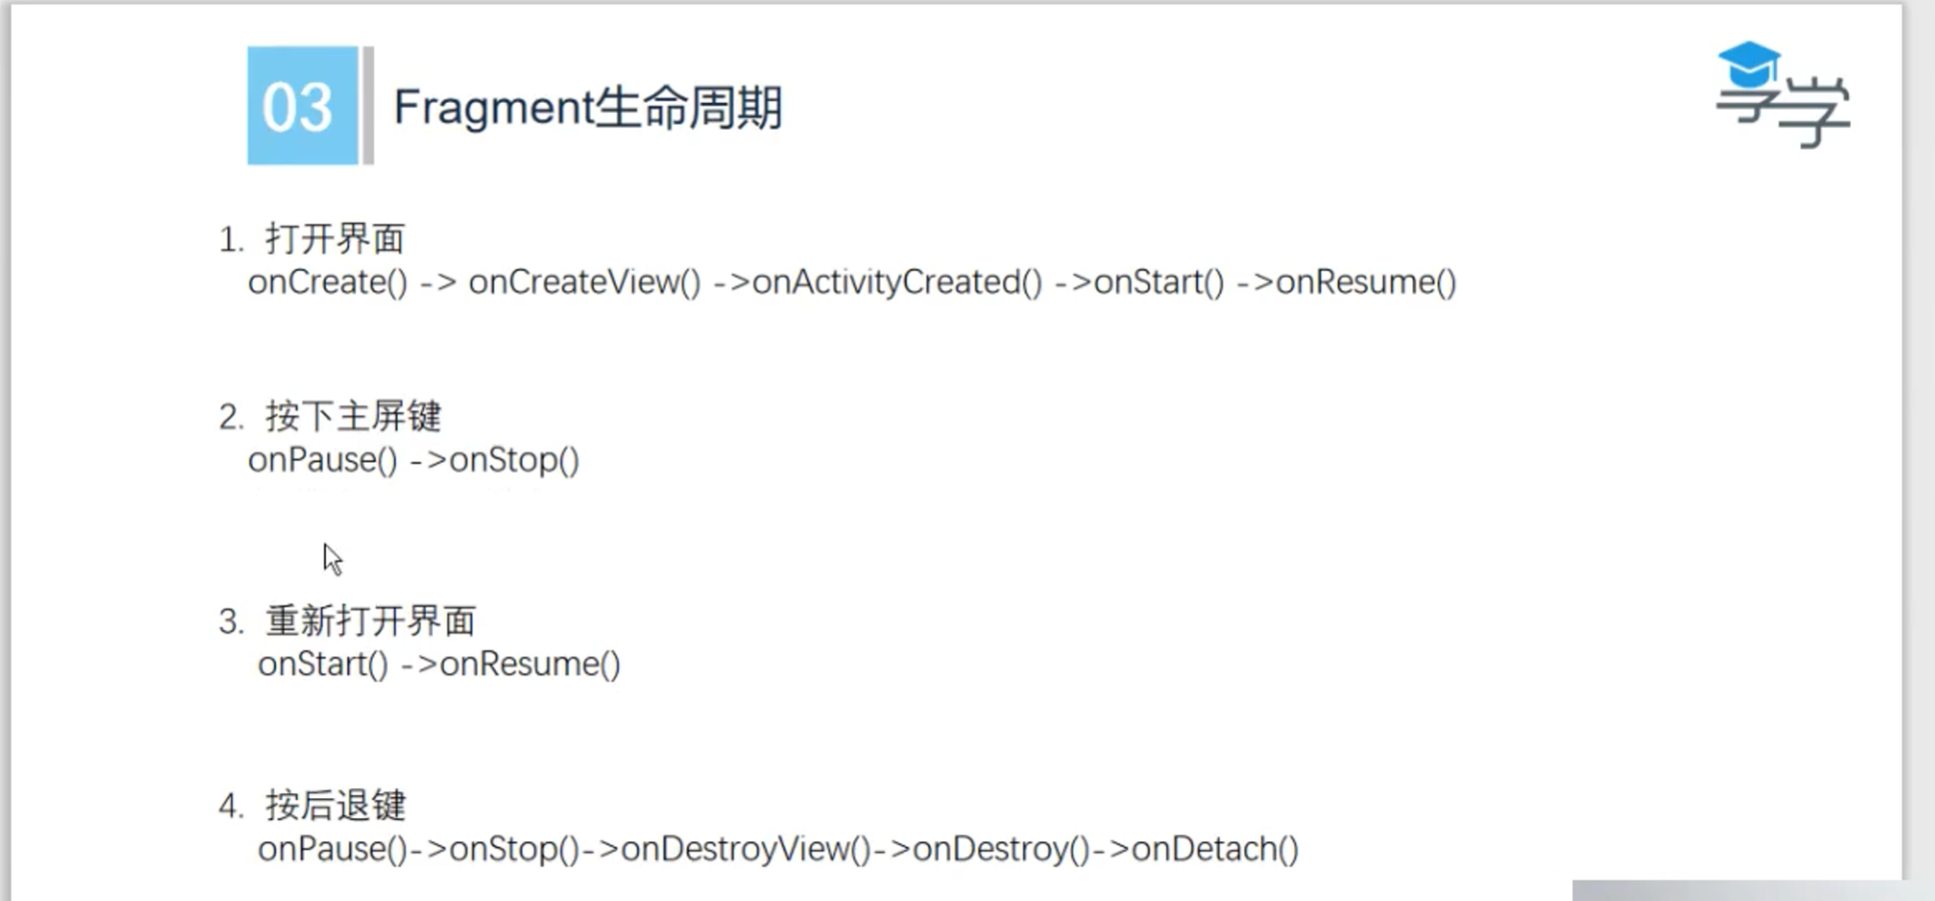
Fragment生命周期
onAttach()用来与Activity进行绑定,onCreate()对Bundle进行解析,onCreateView()进行ui进行解析,必须要重构的数据要在onResume()中获取,创建的时候从小到大,销毁的时候从大到小
加入些调试信息观察生命周期
BlankFragment1 package a.b.c.fragmentmangers;import android.content.Context;import android.os.Bundle;import androidx.annotation.NonNull;import androidx.fragment.app.Fragment;import android.util.Log;import android.view.LayoutInflater;import android.view.View;import android.view.ViewGroup;import android.widget.Button;import android.widget.Toast;public class BlankFragment1 extends Fragment { private static final String ARG_PARAM1 = "param1" ; private static final String ARG_PARAM2 = "param2" ; private static final String TAG = "BlankFragment1" ; private String mParam1; private String mParam2; private View rootview; public BlankFragment1 () { } public static BlankFragment1 newInstance (String param1, String param2) { BlankFragment1 fragment = new BlankFragment1 (); Bundle args = new Bundle (); args.putString(ARG_PARAM1, param1); args.putString(ARG_PARAM2, param2); fragment.setArguments(args); return fragment; } @Override public void onAttach (@NonNull Context context) { super .onAttach(context); Log.d(TAG, "onAttach: " ); } @Override public void onCreate (Bundle savedInstanceState) { super .onCreate(savedInstanceState); Bundle bundle = this .getArguments(); String string = bundle.getString("lele" ); Log.i("lele" ,string); if (getArguments() != null ) { mParam1 = getArguments().getString(ARG_PARAM1); mParam2 = getArguments().getString(ARG_PARAM2); } Log.d(TAG,"onCrate: " ); } @Override public View onCreateView (LayoutInflater inflater, ViewGroup container, Bundle savedInstanceState) { if (rootview == null ){ rootview = inflater.inflate(R.layout.frament_blank1,container,false ); } Button btn = rootview.findViewById(R.id.btn_3); btn.setOnClickListener(new View .OnClickListener() { @Override public void onClick (View view) { String message = fragmentCallback.getMsgFromActivity("null" ); Toast.makeText(BlankFragment1.this .getContext(),message,Toast.LENGTH_SHORT).show(); } }); Log.d(TAG,"onCreateView:" ); return rootview; } @Override public void onResume () { super .onResume(); Log.d(TAG,"onResume:" ); } @Override public void onPause () { super .onPause(); Log.d(TAG,"onPause" ); } @Override public void onStop () { super .onStop(); Log.d(TAG,"onStop" ); } @Override public void onDestroyView () { super .onDestroyView(); Log.d(TAG,"onDestroView" ); } @Override public void onDestroy () { super .onDestroy(); Log.d(TAG,"onDestory" ); } private IFragmentCallback fragmentCallback; public void setFragmentCallback (IFragmentCallback callback) { fragmentCallback = callback; } }
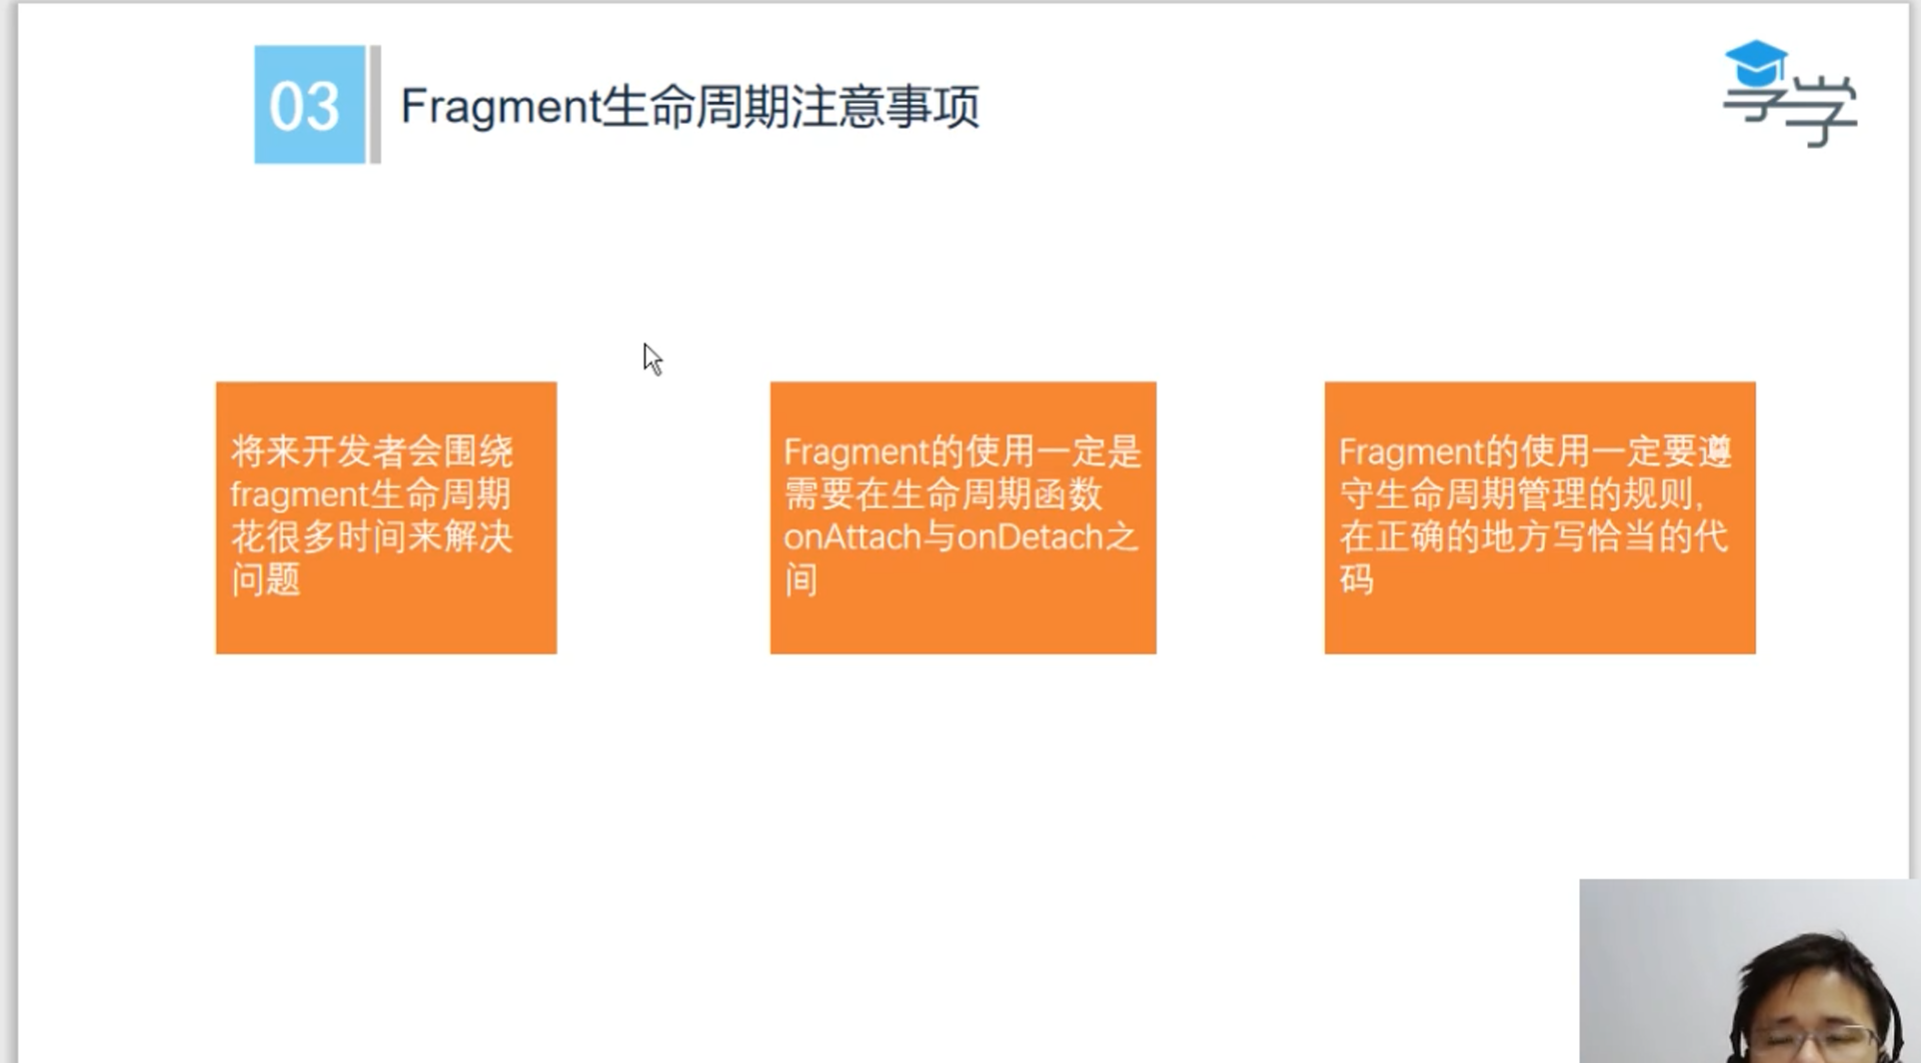
Fragment生命周期注意事项‘
MainActivity.java package a.b.c.viewpagerandfragment;import android.os.Bundle;import androidx.activity.EdgeToEdge;import androidx.appcompat.app.AppCompatActivity;import androidx.core.graphics.Insets;import androidx.core.view.ViewCompat;import androidx.core.view.WindowInsetsCompat;import androidx.recyclerview.widget.RecyclerView;import androidx.viewpager2.widget.ViewPager2;public class MainActivity extends AppCompatActivity { @Override protected void onCreate (Bundle savedInstanceState) { super .onCreate(savedInstanceState); ViewPager2 viewPager = findViewById(R.id.viewPager); ViewPagerAdapter viewPagerAdapter = new ViewPagerAdapter (); viewPager.setAdapter(viewPagerAdapter); } }
package a.b.c.viewpagerandfragment;import android.view.LayoutInflater;import android.view.View;import android.view.ViewGroup;import android.widget.TextView;import androidx.annotation.NonNull;import androidx.recyclerview.widget.RecyclerView;import androidx.constraintlayout.widget.ConstraintLayout;import java.util.ArrayList;import java.util.List;public class ViewPagerAdapter extends RecyclerView .Adapter<ViewPagerAdapter.ViewPagerViewHolder>{ private List<String> titles = new ArrayList <>(); ViewPagerAdapter(){ titles.add("hhh" ); titles.add("lelel" ); titles.add("hhh" ); titles.add("lelel" ); titles.add("hhh" ); titles.add("lelel" ); titles.add("hhh" ); titles.add("lelel" ); titles.add("hhh" ); titles.add("lelel" ); } @NonNull @Override public ViewPagerViewHolder onCreateViewHolder (@NonNull ViewGroup parent,int viewType) { return new ViewPagerViewHolder (LayoutInflater.from(parent.getContext()).inflate(R.layout.item_pager,parent,flase)); } @Override public void onBindViewHolder (@NoNull viewPagerViewHold holder,int position) { holder.mTv.setText(tiltles.get(positon)); } @Ovrride public int getItemCount () { return 10 ; } class ViewPagerViewHolder extends RecycleView .ViewHolder{ TextView mTv; ConstraintLayout mContainer; public ViewPagerViewHolder (@NoNull View itemView) { super (itemView); mContainer = itemView.findViewById(R.id.container); mTv = itemView.findViewById(R.id.tvTitle); } } }
activity_main.xml <?xml version="1.0" encoding="utf-8" ?> <LinearLayout android:layout_height ="match_parent" android:layout_width ="match_parent" xmlns:android ="http://schemas.android.com/apk/res/android" > <androidx.viewpager2.widget.ViewPager2 android:layout_width ="match_parent" android:layout_height ="match_parent" android:id ="@+id/viewPager" android:background ="#03A9F4" > </androidx.viewpager2.widget.ViewPager2 > </LinearLayout >
<?xml version="1.0" encoding="utf-8" ?> <androidx.constraintlayout.widget.ConstraintLayout xmlns:android ="http://schemas.android.com/apk/res/android" android:layout_width ="match_parent" android:layout_height ="match_parent" android:id ="@+id/container" > <TextView android:layout_width ="match_parent" android:layout_height ="match_parent" android:id ="@+id/tvTitle" android:gravity ="center" android:textColor ="#2196F3" android:text ="lele" android:textSize ="50dp" /> </androidx.constraintlayout.widget.ConstraintLayout >
在color.xml文件中定义颜色
color.xml <?xml version="1.0" encoding="utf-8" ?> <resources > <color name ="black" > #FF000000</color > <color name ="white" > #FFFFFFFF</color > <color name ="red" > #FF4411</color > <color name ="colorPrimary" > #6200EE</color > <color name ="colorAccent" > #03DAC5</color > <color name ="colorPrimaryDark" > #3700B3</color > </resources >
package a.b.c.viewpagerandfragment;import android.view.LayoutInflater;import android.view.View;import android.view.ViewGroup;import android.widget.TextView;import androidx.annotation.NonNull;import androidx.recyclerview.widget.RecyclerView;import androidx.constraintlayout.widget.ConstraintLayout;import java.util.ArrayList;import java.util.List;public class ViewPagerAdapter extends RecycleView .Adapter<ViewPagerAdater.ViewPagerViewHolder>{ private List<String> titles = new ArrayList <>(); private List<Integer> colors = new ArrayList <>(); ViewPagerAdapter(){ titles.add("1" ); titles.add("2" ); titles.add("3" ); titles.add("4" ); titles.add("5" ); titles.add("6" ); titles.add("7" ); titles.add("8" ); titles.add("9" ); titles.add("10" ); colors.add(R.color.white); colors.add(R.color.colorAccent); colors.add(R.color.black); colors.add(R.color.red); colors.add(R.color.white); colors.add(R.color.colorPrimaryDark); colors.add(R.color.white); colors.add(R.color.colorAccent); colors.add(R.color.red); colors.add(R.color.colorAccent); } @NonNull @Override public ViewPagerViewHolder onCreateViewHolder (@NonNull ViewGruop parent,int viewType) { return new ViewPagerViewHolder (LayoutInflater.from(parent.getContext()).inflate(R.layout.item_pager,parent,false )); } @Override public void onBindViewHolder (@NonNull ViewPagerViewHolder holder,int position) { holder.mTv.setText(titles.get(position)); holder.mContainer.setBackgroumdResource(colors.get(position)); } @Override public int getItemCount () { return 0 ; } class ViewPagerViewHolder extends RecyclerView .ViwHolder{ TextView mTv; ConstrainLayout mContainer; public ViewPagerViewHolder (@NonNUll View itemView) { super (itemView); mContainer = itemView.findViewById(R.id.container); mTv = itemView.finViewById(R.id.tvTitle); } } }
MainActivity.java package a.b.c.wechatpage;import android.os.Bundle;import androidx.activity.EdgeToEdge;import androidx.appcompat.app.AppCompatActivity;import androidx.core.graphics.Insets;import androidx.core.view.ViewCompat;import androidx.core.view.WindowInsetsCompat;import androidx.fragment.app.Fragment;import androidx.viewpager2.widget.ViewPager2;import java.util.ArrayList;public class MainActivity extends AppCompatActivity { ViewPager2 viewPager; @Override protected void onCreate (Bundle savedInstanceState) { super .onCreate(savedInstanceState); setContentView(R.layout.activity_main); ininPager(); } private void initPager () { viewPager = findViewById(R.id.id_viewpager); ArrayList<Fragment> fragment=new ArrayList <>(); fragments.add(BlankFragment.newInstance("微信聊天" )); fragments.add(BlankFragment.newInstance("通讯录" )); fragments.add(BlankFragment.newInstance("聊天" )); fragments.add(BlankFragment.newInstance("发现" )); fragments.add(BlankFrament.newInstance("我" )); MyFragmentPagerAdapter pagerAdapter = new MyFragmentPagerAdapter (getSupportFragment(),getLifecycle(),fragments); viewPager.setAdapter(pagerAdapter); } }
public class MyFragmentPagerAdapter extends FragmentStateAdapter { List<Fragment>fragmenList=new ArrayList <>(); public MyFragmentPagerAdapter (@NonNull FragmentManager fragmentManager,@NonNull Lifecycle,List<Fragment>fragments) { super (fragmentManager,lifecycle); fragmetnList=fragments; } @NonNull @Override public Fragment createFragment (int position) { return fragmentList.get(position); } @Override public int getItemCount () { return fragmentList.size(); }
BlankFragment.java import android.os.Bundle;import androidx.fragment.app.Fragment;import android.view.LayoutInflater;import android.view.View;import android.view.ViewGroup;import android.widget.TextView;public class BlankFragment extends Fragment { View rootView; private static final String ARG_TEXT = "param1" ; private String mTextString; public BlankFragment () { } public static BlanFragment newInstance (String param1) { BlankFragment fragment = new BlankFragment (); Bundle args = new Bundle (); args.putString(ARG_TEXT,param1); fragment.setArguments(args); return fragment; } @Override public void onCreate (Bundle savedInstanceState) { super .onCreate(savedInstanceState); if (getArguments!=null ){ mTextString = getArguments().getString(ARG_TEXT); } } @Override public View onCreateView (LayoutInflater inflater,ViewGroup container,Bundle savedInstanceState) { if (rootView = null ){ rootView = inflater.inflate(R.layout.fragment_blank,container,false ); } initView(); return rootView; } private void initView () { TextView textView = rootView.findViewById(R.id.text); textView.seetText(mTextString); } }
activity_main.xml 注意:orientation要设置,否则无法正常显示
<?xml version="1.0" encoding="utf-8" ?> <LinearLayout xmlns:android ="http://schemas.android.com/apk/res/android" xmlns:app ="http://schemas.android.com/apk/res-auto" xmlns:tools ="http://schemas.android.com/tools" android:id ="@+id/main" android:layout_width ="match_parent" android:layout_height ="match_parent" android:orientation ="vertical" tools:context =".MainActivity" > <androidx.viewpager2.widget.ViewPager2 android:layout_width ="match_parent" android:layout_height ="0dp" android:layout_weight ="1" android:id ="@+id/id_viewpager" /> </LinearLayout >
fragment_blank.xml <?xml version="1.0" encoding="utf-8" ?> <FrameLayout xmlns:android ="http://schemas.android.com/apk/res/android" xmlns:tools ="http://schemas.android.com/tools" android:layout_width ="match_parent" android:layout_height ="match_parent" tools:context =".BlankFragment" > <TextView android:layout_width ="match_parent" android:layout_height ="match_parent" android:gravity ="center" android:textSize ="36sp" android:id ="@+id/text" android:text ="@string/hello_blank_fragment" /> </FrameLayout >
android:layout_gravity
android:gravity